Here is a cool fall art project. Animal Leaves! All you need do is to create these fun animals is to pick up some leaves hanging around the yard, and glue then together!
Real simple to make. Just mix food coloring with vanilla yogurt or plain yogurt. Such a great idea, and tasty!
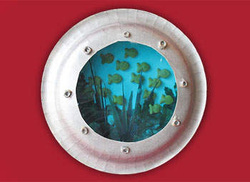 What you'll need: - 2 paper plates
- Silver craft paint
- 8 pieces of ring shaped cereal
- Fish-shaped crackers
- Silk plant leaves
- Sea shells
- Sand
- White craft glue
- Blue cellophane
- Wax paper
- Scissors
How to make it: - Take both paper plates and set them on the table. One should be right side up and the other should be upside down.
- On the plate that is right side up, draw your sea floor about 1/3 up the center of the plate.
- Line the floor area with white glue, use an old paintbrush or your finger to spread the glue out evenly.
- Cover the wet glue with sand and set aside to dry.
- On the upside down plate, draw a circle where you will cut out your porthole in the center of the plate.
- Glue ring shaped cereal pieces around the circle; these are the bolts on the porthole. Let dry.
- Paint the cereal pieces and the paper plate from the outer edge to your penciled lines. Don’t worry about painting over the lines a little, as you will be cutting it out. Set aside to dry.
- Take the paper plate with the sand on it and hold it over a sheet of wax paper. Turn the plate sideways and gently tap it to loosen any excess sand. The sand should end up on the wax paper and you can save that for another project.
- Glue sea life onto the plate with the sand floor. Glue on shells, silk leaves, and fish shaped crackers. Let dry.
- Take the silver painted plate and cut out the center circle to create your porthole window. Place it gently over the top of the other plate to see if you are happy with its size and viewing area. Increase size of the hole if you like.
- Turn silver plate upside down.
- Cut a piece of blue cellophane large enough to cover the hole on the plate and glue in place. Let dry.
- Place porthole plate over the top of the sea life plate and glue together. Let dry.
- You can add a hanger to the project if you like, simply glue some string or yarn between the two plates at the top during step 13.
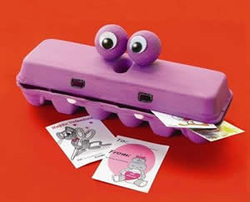 Recycle your egg cartons by using them to make a craft with your child. This hippo is a great way to make a little storage box for your kids to keep their treats. WHAT YOU'LL NEED - Recycled egg carton
- Plastic-foam balls, two 2"
- Wiggle eyes, two
- Acrylic paints: purple, pink, white
- Dimensional paint: black, pink
- Pushpins, two
- Craft Glue
- Paintbrush
PUTTING IT ALL TOGETHER - Glue plastic-foam balls (eyes) on center top of egg carton. Insert pushpins through carton, securing eyes on top.
- Paint outside of carton and eyes purple and inside of carton pink. Let dry.
- Glue wiggle eyes on eyes.
- Paint "teeth" white. Use black dimensional paint to outline nostrils. Let dry.
- Tuck treats, notes, and other special wishes inside box for teachers or friends!
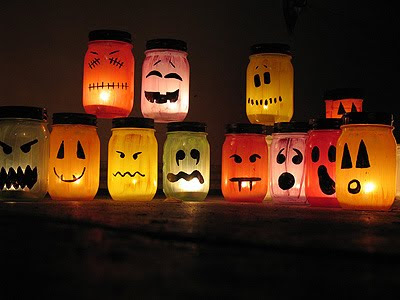
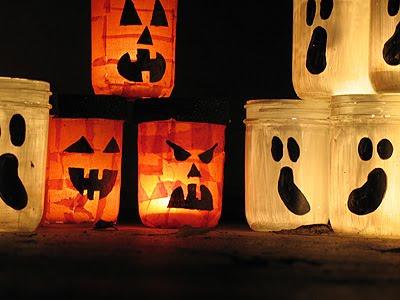
Looking for a fun, and simple Halloween decoration to put around the house? These Halloween painted jar luminaries just require paint, a jar, and a fake candle. Real simple, and real fun to make!
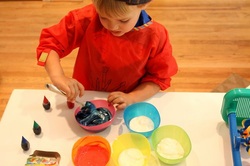
 Materials - 1 baking pan
- shaving cream
- spatula
- 1 toothpick
- food coloring in various colors
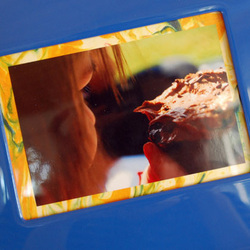
- card stock (I used manila file folders to make a thicker photo mat)
- scissors
- picture frame
- photo of a loved one (that will fit into your picture frame, leaving room for the cardstock background to show through as a border)
Instructions 1.Spread shaving cream all over baking sheet a ½ -inch layer thick. Use the spatula to spread the shaving cream out and flatten it, so it forms an even layer.
2.Using your food coloring, dot the shaving cream all over. You can use one color, a few colors or combine; it's completely up to you and depends on the look you prefer.
3.With your toothpick, swirl the food coloring in the shaving cream.
4.Place your cardstock down onto the colored shaving cream and press lightly.
5.Lift the cardstock up and, using your spatula, gently scrape the excess shaving cream off.
6.Set your cardstock aside and let it dry.
7.Once your cardstock is dry, cut it to fit your picture frame. If you have a photo mat lying around, you can use that as a guide: trace its outer borders onto the cardstock and cut; otherwise, use a ruler (or your best guess).
8.Use double stick tape to affix your photo in the center of your cut, dried cardstock.
9.Place the cardstock with the photo affixed to it in the picture frame making sure that the cardstock borders shows through like a photo mat.
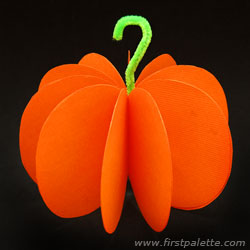 Materials - Orange construction paper
- Green pipe cleaner
- Glue stick
- White glue
- Scissors
Steps 1. Fold any sheet of paper in the middle and drawing an arc along the paper's folded edge. 2.While keeping the paper folded, cut out your pumpkin pattern. 3.Trace the pumpkin pattern at least ten times on orange construction paper. 4.Cut out the pumpkin shapes. 5.Fold each pumpkin shape in the middle. 6.Without unfolding a pumpkin shape, apply glue on one of its outer faces. 7.Glue a second folded pumpkin shape on top of the first one, keeping both pumpkin shapes aligned at the edges. 8.Press on the pair of pumpkin shapes to glue them together. Right photo shows how the pair would look when opened up. 9.Continue gluing the pumpkin shapes one on top of the other, making sure they are aligned along the edges. 10.After you have positioned the last pumpkin shape in place, cut a length of green pipe cleaner to make the pumpkin's stem. Use white glue to attach it along the straight edge of the pumpkin shapes. 11.Glue the first and last pumpkin shapes together, sandwiching the pipe cleaner in the middle. You may need to apply more white glue along the pipe cleaner to make sure that it stays in place. Press on the glued area, especially along the section of the pipe cleaner stem. 12.Once the stem has been secured in place, carefully open up each of the paper flaps to transform your project into a three-dimensional paper pumpkin. When you're happy with how you positioned and spaced the flaps, allow the glue on your paper pumpkin to dry completely. You will discover that once the glue has set, the flaps will be more rigid and your paper pumpkin a lot sturdier. 13.Trim off any excess length on the pipe cleaner stem. You may slightly curve it or shape it into a hooked handle.
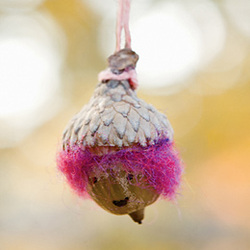 Materials - Capped acorns
- Tacky glue
- Fuzzy yarn and wool
- Permanent marker
- Scissors
- String
Instructions - Gather capped acorns and carefully remove the caps.
- To make hair, put one large drop of tacky glue on the top of each acorn and press wisps of fuzzy yarn and wool roving into it. After applying a second drop onto the wisps, put the caps back on and hold them on for one minute.
- Use a permanent marker to draw faces. Trim the hair, then make "chains" by tying string around the cap stem and securing it with a drop of glue.
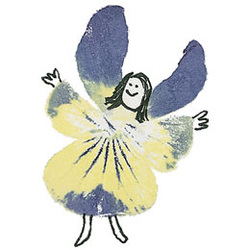 Materials - Flower petals (some kinds work better than others, so you'll want to experiment; we used violas and Johnny-jump-ups)
- Bath or kitchen towel
- Wooden cutting board
- Paper towels
- White card stock
- Hammer
- Fine-tip marker
Instructions - Gather the flower petals in true fairy spirit: be sure they are safe to pick and are in your yard, or use petals you find on the ground. Choose a large petal for the skirt and smaller petals for the arms and wings. Tear petals in half if you can't find the right size.
- Place the towel under the cutting board (this reduces the noise when you hammer). Set 2 layers of paper towel on the board. Place a piece of card stock on the paper towels.
- To print, lay your first petal facedown on the card stock, cover it with a second piece of card stock, and use the hammer to gently tap the area where the petal is sandwiched (no heavy pounding!).
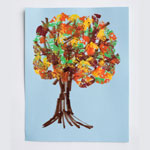 Materials - Card stock
- Pencil
- Scissors
- Painter's tape (optional)
- Kitchen sponge
- Tempera paint
- Plastic plate
Instructions - First, have your child draw a tree trunk with branches on a piece of card stock. On a second piece of card stock, make a stencil for the tree's leafy crown by drawing and cutting out a cloud shape. Lay the stencil on top of the tree's branches, taping it in place with painter's tape, if desired.
- Snip and tear a kitchen sponge into roughly one-inch-wide pieces. Pour a few small puddles of tempera paint onto a plastic plate, and place a piece of sponge on each puddle. Have your child use the sponge pieces to stamp fall foliage onto the branches.
|