Materials
- Orange construction paper
- Green pipe cleaner
- Glue stick
- White glue
- Scissors
Steps
1. Fold any sheet of paper in the middle and drawing an arc along the paper's folded edge.
2.While keeping the paper folded, cut out your pumpkin pattern.
3.Trace the pumpkin pattern at least ten times on orange construction paper.
4.Cut out the pumpkin shapes.
5.Fold each pumpkin shape in the middle.
6.Without unfolding a pumpkin shape, apply glue on one of its outer faces.
7.Glue a second folded pumpkin shape on top of the first one, keeping both pumpkin shapes aligned at the edges.
8.Press on the pair of pumpkin shapes to glue them together. Right photo shows how the pair would look when opened up.
9.Continue gluing the pumpkin shapes one on top of the other, making sure they are aligned along the edges.
10.After you have positioned the last pumpkin shape in place, cut a length of green pipe cleaner to make the pumpkin's stem. Use white glue to attach it along the straight edge of the pumpkin shapes.
11.Glue the first and last pumpkin shapes together, sandwiching the pipe cleaner in the middle. You may need to apply more white glue along the pipe cleaner to make sure that it stays in place. Press on the glued area, especially along the section of the pipe cleaner stem.
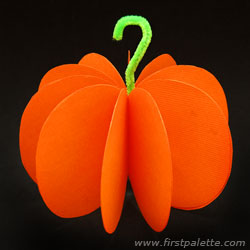
12.Once the stem has been secured in place, carefully open up each of the paper flaps to transform your project into a three-dimensional paper pumpkin. When you're happy with how you positioned and spaced the flaps, allow the glue on your paper pumpkin to dry completely. You will discover that once the glue has set, the flaps will be more rigid and your paper pumpkin a lot sturdier.
13.Trim off any excess length on the pipe cleaner stem. You may slightly curve it or shape it into a hooked handle.
