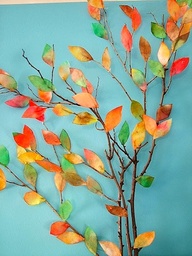
 Materials:
1. Scissors
2. Glue
3. Coffee filters
4. Color
5. Tree limb
6. Water Bottle w/ water
Directions:
1. Dye the coffee filters any colors that you want
2. Spray the filters with water, so the colors spread out
3. Let sit for 30 mins.
4. Cut filters in leave shapes
5.Glue coffee filter leave shapes onto the tree limb
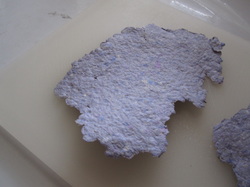 Materials:
1. scrap paper
2. newspaper
3. bowl
4. a blender
5. water
6. towels
7. window screen
Steps:
1.Start by ripping your scrap paper and newspaper into small pieces. The smaller the better
2.Add water . We used a bottle from our recycling bin to help ease the mess.
3.Squish, let soften for as long as your child will wait. We didn’t wait too long but the blending is easier the squishier you get the “pulp”.
4. ADULT ONLY – using a blender blend the water and paper pulp.
5.Put towels ( old ones from when your husband went to Mexico on Spring break in college) under your screen.
6.Pop the pulp on it.
7.Press the water out. You can use a dish cloth ( smooth cotton not fluffy).
8.Flip onto a cutting board and let dry.
9. Let dry for 2 days.
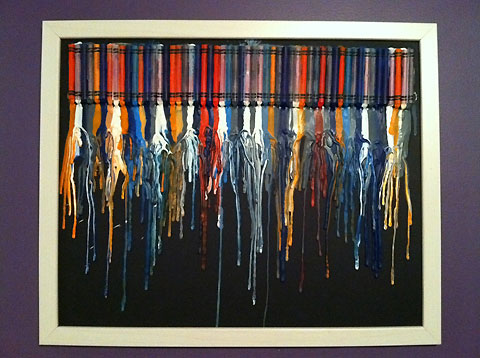
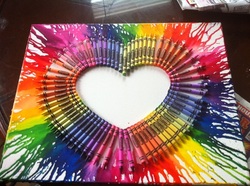 Materials needed: 1. Canvases2. Box of crayons3. Blow dryer 4. Elmer's Tacky Glue5. Old towel or something to spread on the ground Directions: Step 1: Pick out the colors you want to use and line them up until you run out of space. Step 2: Using a glue gun, make a line of glue across the crayons (if you want a certain part showing, like the label, be careful to put the glue on the opposite side). Quickly place onto canvas in a line, as shown below, with tips facing down. Step 3: Line your floor with newspaper, place the canvas against the wall, and get your blow dryin’ on. I started out on high and warm settings on mine, and alternated with low at certain points. You have to experiment a little to see how your hair dryer works with melting the wax. It sometimes splatters a little, so be sure to cover the floor and surrounding wall, and turn to a lower setting if needed. Step 4 (optional): After getting all the colors to melt, I went back over certain colors that I wanted to go further down the canvas. As you can see in the photo on the right, I aimed the heat at the middle of the canvas to melt some of the chunks of wax and get them to drip all the way to the bottom of the canvas.
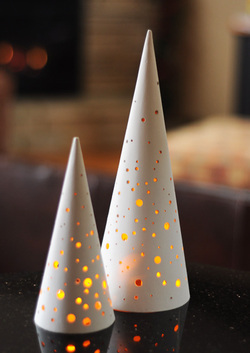 Materials- Papier-mache cones, available in the doll making section of the craft store
- Electric drill and assorted drill bits
- Fine-grit sandpaper
- Optional: Rotary tool and grinding bit
- Matte white spray paint
Instructions 1. Begin by chucking two-three small bits into your drill, and start making holes in a random pattern. I chose to make mine a little more dense and the bottom, and let them thin out towards the top. As you see in the photo, drilling into paper doesn't always leave a smooth hole, but it can be smoothed out with sandpaper. 2. If you happen to have a rotary tool like a Dremel or Roto-zip, you can use a small grinding bit to smooth out the holes while maintaining the circular shape. If not, use a pencil or small dowel rod with the sandpaper to make everything smooth. 3. Take your trees outside or into a well-ventilated area, and give it a coat of flat white paint. Using flat white transforms these guys into looking like spray-painted cardboard to actual ceramic. 4. Spray painting sanded cardboard will likely make the texture a little.
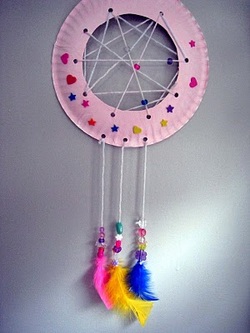 What You Need: - Paper plate
- Elmers Glue
- Beads
- Feathers
- String
- Scissors
- Whole puncher
- Stickers
Steps 1. Cut hole using plate indent as guide. Punch holes around inside edge. Paint.
2. While plate is drying, tie yarn to feather. Make several knots to act as a stopper for the beads. You will need 3 feather strings. Tip: roll a piece of tape around top of yarn, like an aglet on a shoelace. This helps young kids slide the beads on.
3. Randomly string your yarn through the holes. Add a few beads for extra decoration as you go.
4. Punch three holes at what will be the bottom of the Dream Catcher. Tie feathers to bottom of Dream Catcher. Hang on wall or from bed post. If your child does have a bad dream have child blow the bad dream into the Dream Catcher.
 What You Need: - 1/3 cup baby shampoo per paint color
- 1 tablespoon cornstarch per paint color
- Food coloring
- Measuring cups, tablespoon, and stirring spoon
- Plastic cups
- Cotton swabs (optional, for use as paint “brushes”)
What You Do: - Have your child measure out and pour the baby shampoo into a plastic cup.
- Next, ask him to add the cornstarch into the same cup and stir until the ingredients are mixed.
- Help him carefully squeeze two drops of food coloring into the shampoo mixture and stir again.
- Discuss with him the science behind what happened to the mixture when he added the cornstarch. Cornstarch caused the shampoo to thicken up, which helps it stick to smooth surfaces (like a bathtub) better.
- Repeat steps 1-3 three more times to create other colors of paint. Place each color in its own plastic cup. This is a great opportunity to talk about color mixing with your child. Show him how you can mix primary colors together to create new colors.
- During bath time, encourage him to paint on the walls of the bathtub using his new paints. He can fingerpaint, or use the cotton swabs as paint “brushes.” Be sure to supervise while he paints so he doesn't get paint in his eyes, which can sting.
- When bath time is over, help him clean the walls of the bathtub with a washcloth. This activity gives you clean tub walls and a clean child!
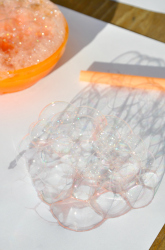 Want to create some really unusual paintings? With a small container of bubbles and a little paint, your kids can put soap suds to work, and make some beautiful prints to hang on their bedroom walls, too! Gather up the simple supplies and throw on some smocks. This project can get a bit messy, but preschoolers love to dip paper into bubbles and then watch them pop. And when the popping is done, voila! You've got a stunning work of art. What You Need: - 2 small bowls
- 1 cup of bubble soap
- Plastic drinking straw
- 2 teaspoons of tempera paint (in two different primary colors)
- Whisk
- Several pieces of white computer paper, cut in half
- Newspaper
What You Do:- Divide the cup of bubble soap in half, putting 1/2 cup in each of the small bowls.
- Pour one color of tempera paint in each of the bowls, then whisk the bubble solution and the paint together until it's combined. Let your child help!
- Give your child the straw and ask her to blow on the straw into the bowl until she gets a pile of colored bubbles. Have her do the same for the second bowl.
- Gently lay one of the pieces of paper over a bowl of bubbles, so the bubbles stick, then lift it carefully, laying it flat on the newspaper to dry, bubble side up.
- Wait and watch. When the bubbles pop, the paint will retain a perfect outline of each bubble's original shape, leaving beautiful images of bubbledom!
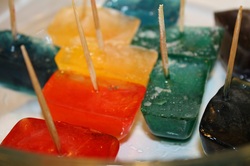 Materials - Ice cube tray
- Small plastic bowls
- Plastic spoons
- Food coloring
- Scissors
- Sketch paper
- Craft sticks or disposable ice cream spoons
Steps1.Since this is a coloring mixing activity, we will start out with the three primary colors (red, blue and yellow). To make the colored water, add at least 5 drops of food coloring to about ¼ cup of water. Mix well. Test the color intensity by painting with the colored water on plain white paper. If you want the color to be brighter or more intense, add a few more drops of food coloring until you achieve the desired color. 2.Prepare your ice cube tray. Spoon in the colors into each tray section by pairs to come up with the secondary colors—orange (yellow + red), green (yellow + blue), and purple (blue + red). 3.Pour in some red, blue, and yellow on some of the remaining tray sections
.4.Once satisfied with the mixed colors, put the tray inside the freezer.
5.While waiting for the ice cubes to freeze, prepare the handles for the ice cubes. You can use disposable wooden ice cream spoons or you may cut craft sticks in half.
6.Check on your ice cube tray after about 30 to 45 minutes. When the colored water is half-frozen, stick in a craft stick handle into the center of each ice cube.
7.Put the ice tray back in the freezer.8.When the ice cubes are solid frozen, take out the ice tray from the freezer and allow it to stand at room temperature for a few minutes. Twist the ice tray slightly to loosen the ice cubes.9.Give your child as much paper as he needs to paint. Most kids love to keep on painting with these ice cubes until they're almost melted.
 Want to add a little sparkle to your home? Make an eye catching sun catcher with your child that not only brightens any window but also builds his fine motor skills and creativity. Instead of using traditional paint or crayons, he'll experiment with baby oil and a cotton swab. This is a great science and art experiment that's sure to make any winter afternoon a little sunnier. What You Need: - Construction paper in various colors
- Medium bowl
- Marker
- Scissors
- Baby oil
- Water
- Small plastic container
- Cotton swabs
What You Do: - Get started by having your child use a marker to trace around the medium bowl on a sheet of construction paper to create a circle. Have him cut out the circle (boost those fine motor skills!).
- Before constructing the sun catcher, let him experiment making lines and designs on a sheet of white paper with crayons. Don't forget to encourage him with lots of positive praise.
- Trade the paper and crayons for the construction paper circle. Explain to him that he won't be drawing with crayons—he'll use a cotton swab instead!
- Pour a small amount of baby oil into the plastic container. Have him dip the cotton swab in the baby oil and draw lots of lines and scribbles on the construction paper circle. What does he think the baby oil will do to the paper?
- Watch as the oil changes the construction paper! Did it change in the way he thought it would? For comparison, ask him to dip a cotton swab in water and see if it changes the construction paper the same way the baby oil did. Why does he think the baby oil makes interesting lines and water doesn't?
- Encourage him to continue drawing designs on the sun catcher with the cotton swab.
- When he's done painting, hang the finished sun catcher in a window and watch at it glows in the sunlight.
|