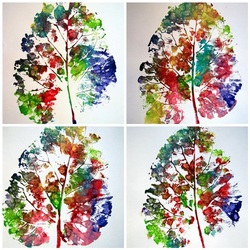
Materials:
1. Paint
2. A big leaf
3. White construction paper
4. A lid or pan
Directions:
1. Pour paint colors of choice on a lid or pan to hold the paint (acrylics in a variety of colors)
2. Then have the children pressed the leaf into the paint
3. Then transfer the leaf to the paper. (Children really need to press down all around the leaf...making sure to press all the way to the corners. It takes a minute or two for small hands to be able to do this.)
4.Carefully lift the leaf off the paper.
The results of the mixed colors are striking!
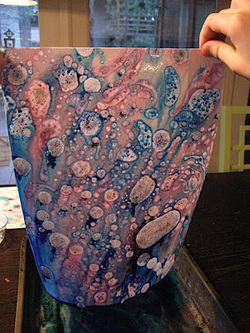
Materials:1.shallow pan
2.food coloring
3. cooking oil
4. white paper
5. water
6. an eye dropper
Directions:
1.Put just enough water in the pan to cover the bottom (**VERY IMPORTANT!**). As we discovered, if the water is too deep, the color will sink if you work too slowly.
2.Put about 1/2 tablespoon oil and 1 teaspoon food coloring into a glass (we halved the proportions of the original since we only had tiny bottles of coloring and I didn’t want to use it all up).
3.Beat it hard with a fork until well blended. It is like mixing an oil and vinegar salad dressing and will take a few minutes. We experimented with mixing it in a jar and shaking it up. That worked even better, just make sure the top is on tightly (we had a bit of a food coloring disaster the first time my daughter tried it)
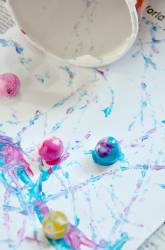
4. Using the dropper (or gently pouring if you don’t have a dropper), place drops of colors on top of the water. The drops will stay in a blob, or perhaps explode a bit. You can place one color inside another. Experiment.
5.When you have dots of color all over the surface of your water, use a toothpick, or a fork, or a feather (whatever you want to try) to make patterns in the colors. They’ll make blobs and swirls and pretty patterns.
6.When you are happy with the design, gently place your paper on top of the water. Leave it for a little bit. We waited until the oil started to show through the back of the paper (about 30 seconds?) and then peeled it gently off.
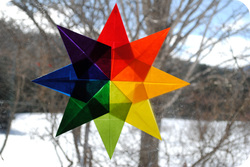
Directions:
I. Choose eight pieces of paper.
II. Lay out one square of paper.
III. Fold this paper in half lengthwise.
IV. Now fold your paper in half once again forming a smaller square shape.
V. You may now open up this square shape and you will be left with creases that will form four smaller squares within the larger square.
VI. You will start with one outer edge of the paper pulling the point of the paper into the center.
VII. You will continue to fold in all four sides in the same manner which will form four small triangles.
VIII. Next you will set the paper on the table facing you like a diamond shape. Proceed to fold the left point up against the center 'line' forming a sharp point at the very top.
IX. You may fold in the other side in the same manner, making sure to fold precisely making a sharp point.
X. Flip your paper over and congratulations, you have made the first point that will make up your window star!
XI. Continue this step by step process until you make 8 points for your window star.
XII. The next step is to glue your star together. Use very little dots of glue, a glue stick would work even better. Start with your first color and add glue into the lower right hand corner. The next piece will line up against the center fold and proceed to glue the two together.
XIII. This is the start of forming your star. Continue on with this process until all eight pieces are used.
XIV. You have now made your very own Waldorf inspired kite paper window star!For a chance to make smaller stars simply cut two sheets of kite paper into four segments.
Ingredients List:
1.Borax 1 tsp
2.Water 1 1/2 cup
3.Elmers Clear 1/2 cup (4 oz container)
(or White or light blue) school glue
4.Glow Powder 1/2 tablespoon (optional)
(or Glow in the dark paint)
5.Food Coloring few drops (optional)
Directions:
1. Add 1 teaspoon of borax to 1 cup of warm water
2. Add 1/2 Table Spoon Glow Powder to Borax and water. If you don't have glow powder you can add 1/2 tablespoon Glow In The Dark Paint.
3. Mix for 30 seconds (Glow paint may require a whisk to mix properly, however glow powder will not dissolve, so don't be alarmed by powder at the bottom of the bowl)
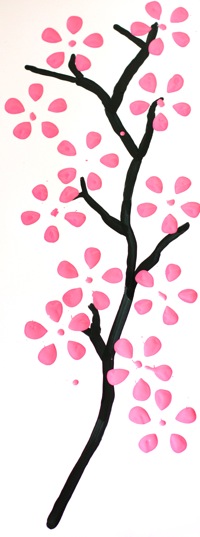
Directions:
1. Start by using dark paint to paint a branch on poster board. Branches are easy to paint. If you can’t paint in a straight line, it looks even better.
2.I cut this piece of poster board in half lengthwise because I want it to look more like an art panel than a poster.
3. Once the branch is painted, let it dry before continuing with the stamping.
4.Now let’s do the stamping. Pour some paint on a paper plate and dip the plastic bottle.
5.The bottom of 2-liter soda bottle has five points like the five petals of a cherry blossom.
6.Press the plastic bottle on the poster board, then lift up. Dip the bottle in more paint each time you repeat the stamp. This is really fun, add as many blossoms as you want.

Materials:
1. canvas
2. caps
3.large bottle of matte Collage Pouge (found in the decoupage section of craft stores)
4. plastic glue
5. acrylic paints.
6. X-Acto knife
7. course sandpaper
8. an old paint or glue bottle with a pointy tip or you could just use a plastic baggy.
Directions:
1. First, I sanded the top of the lids and roughed them up with an X-Acto knife to help the caps stick to the canvas. Next, I used a generous portion of the Collage Pouge so it oozed out the sides. You may want to put stack of newspapers under the canvas to prop it up so the canvas wont sag under the weight of the caps. I had a large cap from a jug of protein powder that I just glued underneath for support.
2.I started gluing at the center and worked out. I then filled an old paint bottle that has a pointy tip with the Collage Pouge and squirted the Pouge in all of the spaces to make sure these caps will stay put! (Not sure if this step is totally necessary) You can just fill a plastic baggy with the Pouge and cut a little hole if you don't have a bottle with a pointy tip! If you want to add caps inside of larger caps, use a plastic glue or E-6000. Finally, I filled some of the caps with acrylic paint, the little bottles of paint from craft stores are the right consistency for this. Then I let dry flat for a few days; and I now have a colorful, textured piece of upcycled wall art!
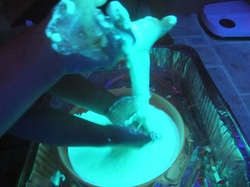
Materials:
1. Water
2. Cornstarch
3. Small cups
4.Food coloring
Directions
1.All you do is mix 1 cup of water with 1 cup of cornstarch.
2. Then pour it into muffin tins or small cups.
3. Then add food coloring to make the colors you would like. Wilton food coloring gel can make some very bright and vibrant colors!