 Materials:1. Cold-press board
2. Frisket masking liquid
3. Paint brush
4. Silk or plastic greenery
5. Spray paint
6. Eraser
7. Kraft paper or newspaper
Directions:
1.Cover work surface with kraft paper or newspaper. Decide the size and number of frames you'll use for your arrangement. For each frame, cut a piece of cold-press board an inch smaller on all sides than the inside measurements of the frame.
2.To create the irregular white border on each board, brush frisket along the edges of the cold-press board with an imperfect stroke and let dry. The frisket will prevent spray paint from getting onto the board wherever it is applied. The frisket dries quickly, so you will need to move fast when applying it.
3.Place silk or plastic greenery on each board. It's okay if the greenery extends past the edges of the edges of the cold-press board because the final result will be more graphic. The greenery should lay as flat as possible. (You might need to manipulate the piece, bending the greenery so it lays flat.)
4.Spray the board with a single coat of paint. (Nearly any spray paint will work. Practice on a scrap piece of paper first.)
5.Remove the greenery, and allow the paint to dry, following the recommended guidelines on the paint can for dry times.
6.Carefully remove the frisket. Start at the corners and use your fingers to begin lifting the frisket off the board.
7.Use an eraser (a regular pink eraser works well) to remove the portions of the frisket you cannot lift off with your fingers
8.Affix each print to a white paper backing and place it in a frame.
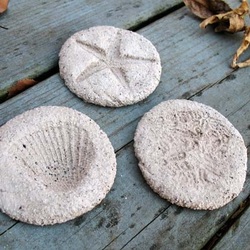 Materials: - 1 cup of used coffee grounds
- 1/2 cup of cold coffee
- 1 cup of flour
- 1/2 cup of salt
- Wax paper
- Mixing bowl
- Some small objects to make impressions in the dough (Shaped cookie cutters work well.)
- Empty can or a butter knife
- Toothpicks, optional
- String to hang your fossil, optional
Directions: - Stir the together the coffee grounds, cold coffee, flour, and salt until well mixed.
- Knead the dough together and then flatten it out onto the waxed paper.
- Use the can to cut out circles of the dough or use the dull knife to cut slabs large enough to fit your "fossil" objects.
- Press your objects firmly into the dough.
- When you take the object out, you have your "fossil". If you want to hang the fossil, poke holes into the edge to hold the string.
- Let the fossil dry overnight (and up to two days) and then hang it if you wish.
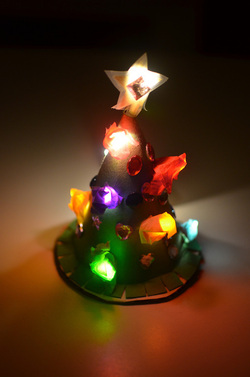 Materials:
1. string of STRALA lights
2. festive cereal box cardboard
3. a random circle of corrugated cardboard
4.green paper.
Directions:
1. First, cut a segment of a circle to roll into a cone, out of cereal box cardboard. Glue that onto green paper.
2.Cut that out and do two things to it. One, snip the bottom (curved) edge. Two, poke holes in it for the little lights.
3.Now, you don't have to do this if you're lazy, but kids seem to like this, so make a star. I cut two small stars out of paper and stuck scotch tape over both sides, then trimmed the excess off, so only the border of scotch tape holds the two star layers together. Sort of like a star-shaped pita pocket. Insert the endmost light of the string into the star
4.Poke the other lights through the holes, sticking them in place with more masking tape.
5.Then glue the ends of the cone together, shove all the wiring into the completed cone, cut a radial slit in the cardboard base and squeeze the wire through that
6.so the battery pack (with the switch) remains outside, hanging on a short wire.
7. Then glue the cone onto the base (this is why you made slits in the bottom edge of the cone earlier).
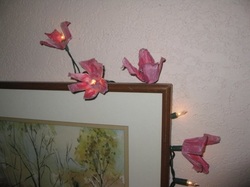 Materials:- egg cartons - craft paint, acrylic - craft paintbrush - light strand Directions: - Separate the egg carton lid. Remove the lip from the egg carton side where the eggs sit. Separate all of the separate egg segments. They tear fairly easily or use scissors and cut them.
- Cut away parts of the egg carton segments to create petals. I made four or five petals per flower. Do whatever looks good to you.
- Paint the egg carton segments to resemble flowers. Use a solid color or several tones. I used three shades plus white/vanilla paint for depth and a more natural look.
- Paint the inside of each section then let them dry. Then paint the outside of each section. Let dry.
- Poke a small hole from the back to the front for the light to go in. A pencil or an ice pick works fine. Push a light bulb through a hole in the soft egg carton. Stop at the end of the light bulb. (Don't push the light bulb farther. This position keeps it secure on the light strand.)
- Leave a few lights bare if you want or fill the entire strand with egg carton flowers.
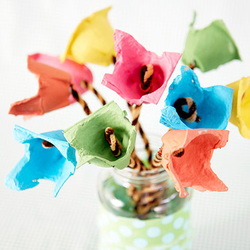 Materials-- Egg carton -- Scissors -- Acrylic paint (variety of colors) -- Paint brushes -- Pipe cleaners -- Glass jar -- Fabric scraps Directions: 1. Cut out individual egg holders from an egg carton. 2. Paint the outside of about 10 egg holders in a variety of colors using acrylic paint. Blend colors as desired. Allow at least one hour to dry and then paint the insides. 3. Twist together two different-colored pipe cleaners to make the stem. 4. Poke a hole in the bottom of each "flower" and pull the pipe cleaner through. Make a loop at the top to secure. 5. Place flowers in a clean, glass jar. Wrap a scrap of fabric around the jar to add more detail to this timeless, recycled bouquet.
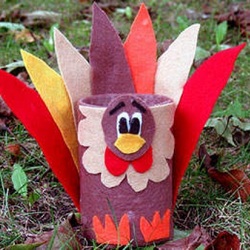 Materials: - 1 vegetable can
- Felt: brown, red, orange, tan, goldenrod, white, black
- Scissors
- Tail pattern
- All other patterns
- Scissors
- White craft glue
- Hot glue gun
Directions: - Inspect the opening of the vegetable can and be sure there aren’t any sharp edges. If there are, use a piece of sandpaper to wear them down. Remove label, wash and dry completely.
- Lay can on its side on the short end of the sheet of brown felt. Roll up to determine how much felt you will need, trim the end so that you have about an inch overlap at the top, bottom and around the perimeter as well. Glue the brown felt to the can, folding over the excess and gluing to the bottom and inside the lip of the can. Look for the seam, this will be the back of your turkey.
- Using pattern, cut out the tail from a piece of cardstock, you will need this to glue your felt to as the felt is too flimsy to stand on its own. Using the other patterns, cut out a red waddle, white eyes, black pupils, brown head, black eyebrows, goldenrod beak, tan collar, and orange feet. For tail feathers, cut out 2 red, 2 tan, 1 orange, 1 goldenrod and 1 brown.
- Glue the collar, straight side lines up with the top of the can, to the front of the turkey (remember, seam is in the back).
- Glue the red waddle just above the bottom of the collar.
- Glue the head over the top of the waddle, leaving just the bumps of the waddle showing below the head. The head will be above the lip of the can
- Glue on the whites of the eyes in the center of the head. Glue on the black pupils to the white.
- Glue on the goldenrod beak, overlapping the bottom of the eyes slightly.
- Glue on the eyebrows above the eyes, pointing upward.
- Glue 2 orange feet to the bottom portion of the can.
- Lay the card stock tail template on to the table. Glue a red felt tail feather on top of the far right point. Repeat on the left side with the other red tail feather. Glue a tan feather to the next point on the right, overlapping the first red one. Do this on the left as well, using a goldenrod tail feather.
- Repeat on the right with an orange feather and on the left with a tan feather. Finally, glue the brown feather to the center point, overlapping feathers on both sides. Be sure there is no card stock peeking through, all should be covered with felt feathers.
- Hot glue the completed tail to the back of the can. Put some hot glue on the sides of the can and squeeze the tail feathers around the side by gripping the can with your hand.
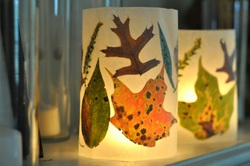 Materials:1. wax paper
2. scissors
3. iron
4. some clear tape.
Directions:
1. Tear off a piece of wax paper. Now you have two options – cut it in half or fold it in half. Either way, the idea is to have a wax side facing up. Arrange your leaves on the wax side.
2. Then fold/lay the other part of the paper over it wax side down and press lightly with a medium-hot iron.
3.If you’re lazy and have messy edges like mine, trim them up once the paper cools off a little. Then bend it into a circle and use a piece of clear tape to make it stay – I found that cutting the tape longer than the lantern and then folding the ends over made it stick really well.
...Now with a little candle light, you’ve got fall magic.
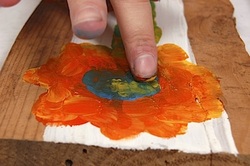 Materials:1. a piece of cast off smooth wood (for example: an old shelf, stair, wooden box side, scraps from 2.building project, even a narrow rectangle will work well) 3. gesso 4.larger bristle or foam brush about 2" (52mm) 5.acrylic paints 6.small damp sponge 7.newspaper 8. Plexiglas palette 9. paper toweling 10.sketching paper 11.pencil 12.flower catalogs, live flowers, or photographs of flowers
Directions:
1. Starting with the stems and leaves begin with
blue paint on just the tip of your finger and paint a dot
at the bottom of the stem. Work your way up the stem
a little at a time, using this dot method.
2. While the blue paint is still wet, clean your
fingertip on the damp sponge and then dry it on
a paper towel. Pick up some yellow paint and mix it
into the blue paint on the stem of the flower. Using
an up and down “tapping motion” you will mix the
paint to make the stem green. More yellow paint will
make the stem lighter and less yellow will make it
darker. Try shading the leaves or the stem using this
method of light and dark. Continue painting the stems
and leaves until you are finished with them. Wiping
your finger between colors keeps your pallet neat and
prepares you for the new color of the blooms.
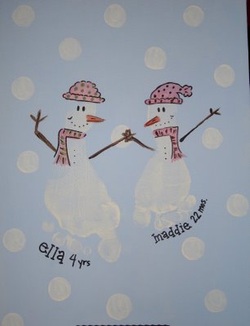
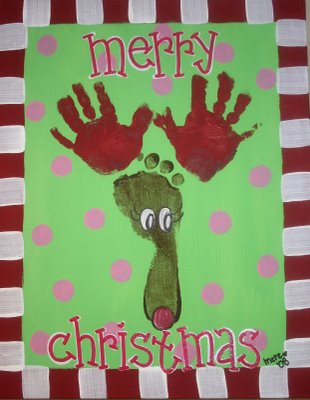
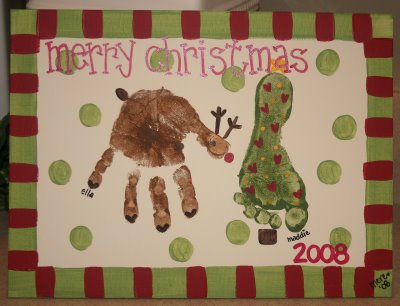
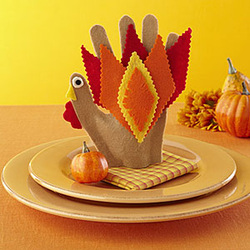 Materials: - Feather, beak and wattle templates (download our felt turkey template)
- Printer and plain white paper
- Scissors
- Fine-tip black marker
- 2 sheets tan felt (available at craft stores)
- Hot glue gun
- Pinking shears
- 1 sheet each red, orange, yellow and white felt
- 1 mini black pompom (available at craft stores)
- Cotton batting or tissue paper
Directions - Download the turkey template; print and cut out.
- Use marker to trace your handprint on 1 piece of tan felt. Be sure to spread fingers and point thumb up.
- Cut out handprint, then place it on second piece of felt and trace around it. Cut out. Make a thin bead of glue along edge of 1 felt hand but not across the bottom. Put second felt hand on top. Press together and let dry.
- Use feather template to make a total of 7 feathers out of red, orange and yellow felt. Cut out with pinking shears. Trim one feather to make it slightly smaller than others, and use scissors to fringe edges. Glue feathers to felt handprint in slightly overlapping layers.
- Trace wattle template onto red felt and cut out. Trace beak template onto yellow felt and cut out. For turkey's eye, cut a small circle out of white felt and glue mini pom-pom to center. Glue each facial feature to thump of handprint.
- Gently stuff cotton or tissue paper into opening at bottom of handprint so turkey stands easily.
|